
Go Green & Save Green While Staying Warm This Winter

I purchased an older home, built in 1952. A pretty small 2 bedroom 1 bath cottage/ranch hybrid, on a contrasting beautiful couple of acres.

Here She Is. The Old House—THE PINTEREST PROJECT! the small cottage on 2 wooded acres that will soon be a “Quaint Cottage On A Functioning Homestead” (this has all been put on major hold)
This house seems to have been put through a lot!
When you first purchase a home with “character,” your wallet is left pretty lean. Big expenses are usually forcibly put off. I found myself in this very pickle, and I needed HACKS! FAST! Not for educational fun! This time, for survival!! 😱😊
I discovered that this tiny house needed an ENTIRE HVAC SYSTEM REMOVAL AND REPLACEMENT!!! holy nooo! not only that:
no insulation in the attic or in the crawl space
the ancient HVAC system
it was so old it didn’t even meet the minimum requirements for 2015!
they couldn’t even tell what make or model the unit was!
improper electrical installation
the previous home-owners had re-installed the electrical system like an actual child (leaving it illegal and absurdly dangerous)
and a whole list of more
This gave me reason to learn as much as i could to make up for what the house was lacking. I needed to spend as little money as possible, and get the best results. This quest has really turned me into a loving homeowner, and a fan of responsible home ownership.
Today, i’m sharing certain hacks i’ve used that involve saving energy, which saves money, and actually makes life easier. Bonus: it is gratifying to know you’re doing the right thing and the smart thing for yourself and the environment! You’re takin’ care of business!
Each of these ideas is as easy as the other, and even if you DO have a working HVAC system, these steps will still save you cash + reduce your energy use. You’ll be living in a smarter home and a greener/more environmentally friendly home. Impressive, non?
❤❤❤
go green ♻ save green $$$ ❄stay warm🌡
SOME QUICK TIPS
1) Installing Thermal Grade Curtains
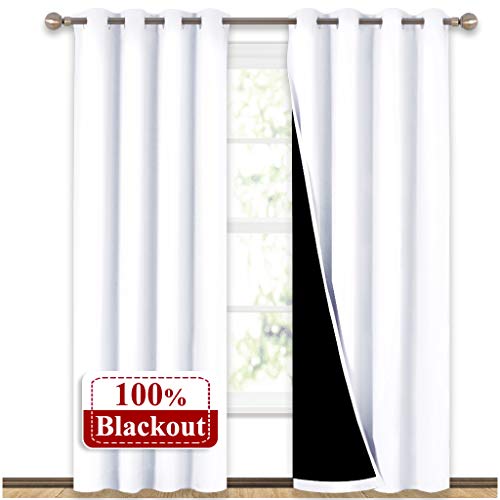

Thermal or Solar rated curtains insulate your home from the cold and the heat. Info-Pic from eBay’s Solar Thermal Curtains Page
Trust me, these WORK! Shockingly well, I might add. They are available everywhere curtains are sold. And they are affordable, i.e. $11 at Walmart. When looking for the right curtains for your needs, usually you don’t have to look further than the packaging itself. The curtain’s product info tells you all you need to know about it’s fortitude against light (how much will be filtered), heat and cold (measured in degrees), and harmful UVA/UVB rays. If you already own curtains that you don’t want to replace, you can purchase a curtain liner that easily attaches to back of your curtains. Some liners you can hang on a curtain rod like a second layer of curtains. These options are just as affordable!
2) OH SNAP, CHECK OUT THIS COOL CEILING FAN TRICK!!

THE UNDER-RATED CEILING FAN DOES MUCH MORE THAN JUST WHIP UP A BREEZE
If you have ceiling fans in your home, make sure they are safely installed—not flying around (so scary!)—and give them a good cleaning. Ceiling fans are pretty cool (no pun intended). They are dual purpose, just like the curtains!
When you want to make the place feel more cool and less hot: have your fan blades rotating counter-clockwise. This is the traditional setting, fan blowing wind onto us on a hot or muggy day.
When you want to make the place feel less cold and more warm: find the switch on your fan—it is usually above the fan blades and on the "neck" of the ceiling fan. This switch reverses the direction in which your blades turn! So flip the switch to get your blades turning clockwise. This is a really neat, often hidden, function of the ceiling fan! The fan becomes an exhaust fan, drawing the air upward. The air has nowhere to go so it eventually dissipates throughout your room.
Because hot air rises, it will be lingering near the ceiling of your home while the colder air wraps around your poor little toes. The ceiling “exhaust” fan will draw the cold air up and away toward the ceiling, and spread about the warm air, forcing it back downward. I will admit, the effects are mild, especially if you have no other source of heat running. If you do have a source of heat (HVAC, fireplace, etc), then the warming effects of the "backwards fan" are stronger and more noticeable (even according to department of energy (link below)
Either way, it is a super useful hack to know about!
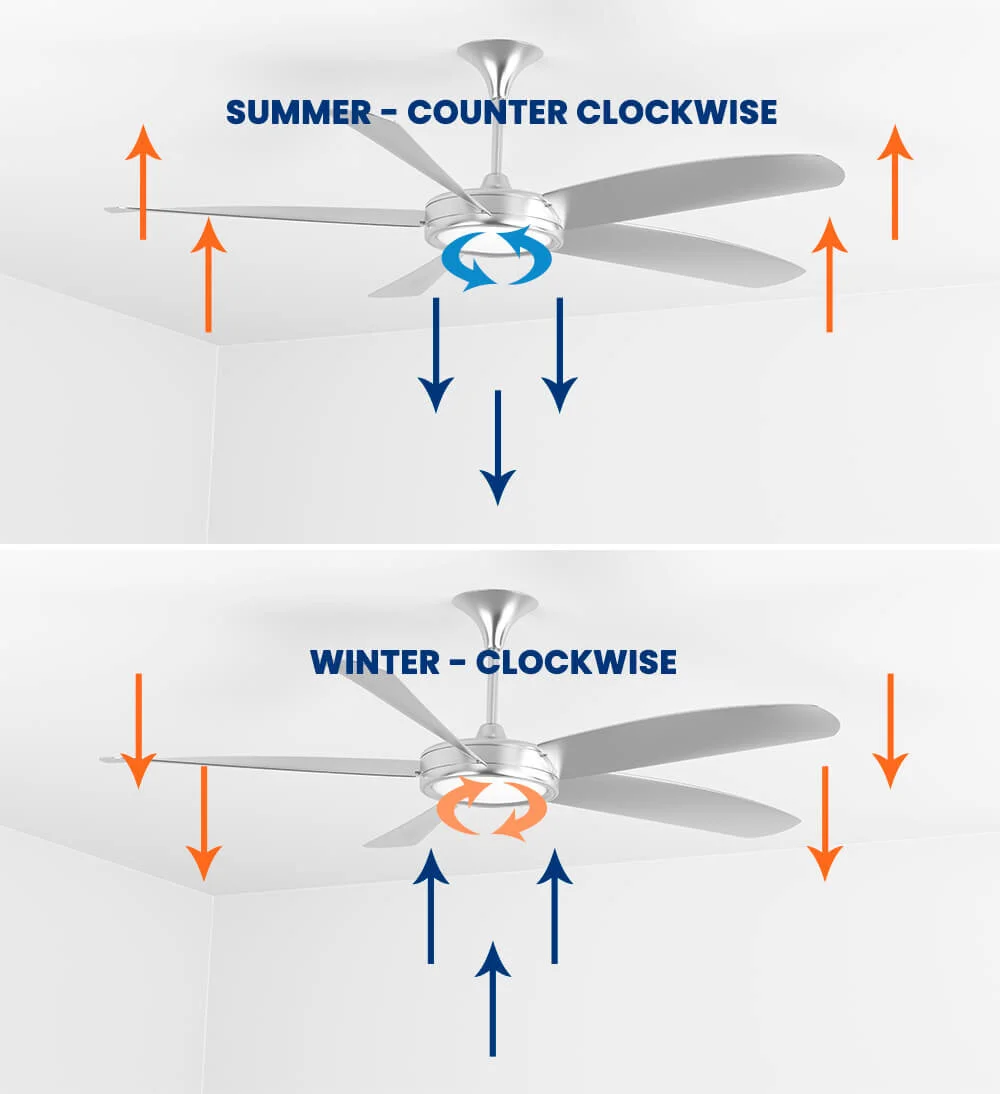
THIS PICTURE REALLY HELPS ILLUSTRATE WHAT I HAD A HARD TIME EXPLAINING. THIS PHOTO AND A BETTER EXPLANATION OF THE SUMMER/WINTER CEILING FAN TIP CAN BE FOUND HERE—SAVE HOME HEAT COMPANY
And Check This Out!!
“Most fans are built for year-round use, and taking advantage of this can help homeowners improve their energy savings. According to estimates by the U.S. Department of Energy, correctly using a ceiling fan can save on both cooling and heating costs. When used in conjunction with air conditioning in summer, you can raise the thermostat 4 degrees with no loss of comfort and recoup up to 30 percent on your energy bills; in winter, you can expect to cut costs by up to 15 percent. To fully realize the savings, you must get in the habit of turning off the ceiling fan when all the occupants have left a room. The fan operates by making people in the room feel cooler or warmer, rather than changing the temperature of the air itself. Therefore, shutting the fan off when the room is empty ensures no electricity is wasted.”
Excerpt from Home Depot Article
In Short:
Summertime Fan can save you 30% on your energy bill!
Wintertime Fan can save you 15% on your energy bill!
That’s a lot of coin to keep for pulling a string!! High Five!
3) Check Windows and Doors for Drafts—and then Fix It in 2 Seconds…
…with ANY of the products on the market right now. When it comes to leaks and cracks? DIY-ers are being fed a-plenty with dozens of new innovations! They are STRONG and EASY! (you remember the guy in the boat right?! Flex-Seal, I believe his name was? 😉 Yeah, and he turned a screen door into the bottom of a “john boat” or “outboard motor boat” over night. and we have immediate access to this type of stuff!)
To check for drafts/leaks, you can schedule for professionals to come and scan with sensitive detectors, or you can just hold your hand or face up to the edges of your windows and doors to feel for cold or hot air coming in from outside. See!? Super Simple! Super Cheap!

Windows & Doors
To Save Energy and Money, Check Your Windows and Doors for Drafts aka Air Leaks. Then you can seal them DIY or hire a professional.
Savings Projects—How to Seal Air Leaks with Caulk
—poor insulation is one of the leading causes of “resource waste” in homes—
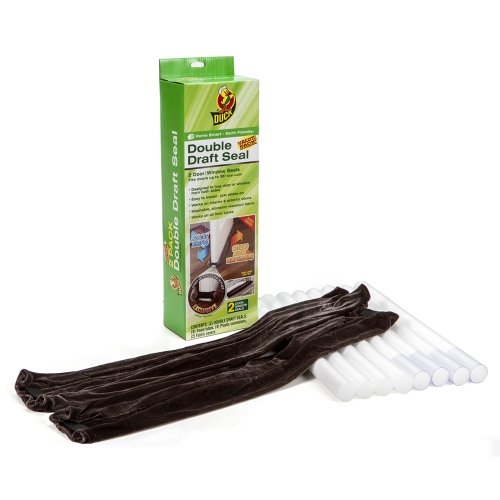
So, for my casa, the doors and windows are a hodge-podge, some old, some updated. The doors, though, are horrible! They don’t fit their door frames and air pours in. I finally couldn’t take it one freezing cold night, and went to the nearby Walmart to get whatever i could. I purchased a couple of different models of Duck Brand door draft sealers. Here are the products i tried out & how they worked out:
1) This first one, the “slide on”, works great, but it is a little weird. Its like a rubbery plastic and you do have to cut it to fit the door—and its not all that easy breezy. You need a saw and some muscle. But it looks the nicest and is the most uniform. It is intended to be a solution, not just a band-aid. I purchased these late-night, not planned out.
Measure your door and doorjamb before you buy this for best outcome. Also! These won’t fit if the door’s gap is very uneven. (example: my door was very far from the floor on the side of the door knob, and close to the floor on the side of the hinges—this will not work for a door like that)


2) These i had such high hope for, but never got the chance to use them. (they have super high ratings!) very diy friendly. you stick the foam bodies into the velvety brown case. they seem like they would have been great. and because they are foam, any needed cutting or messing with the shape would have been a breeze. UPDATE! BOTTOM OF POST!

3) This last one, i ended up using the most, but not because it was the best of the three products. This door draft was not the best in quality, BUT WAS the only one that i could possibly get to fit my doors! I have two old wooden doors with big & uneven gaps underneath them. When i began to freeze; this plastic weirdo came through❤. (the organic description of plastic weirdo is apparently appropriate—though they are still available wherever they are in stock, they have been discontinued😄🙁)
They are stick-ons! #beginnerfriendly #diypower! You remove the paper (peel-and-stick😍) and stick it onto your door, push and hold. They are a great quick-fix.

oh my gosh! i just found this! if only i’d known before! who thinks to go on duck’s website btw 🤨😁
the very resource you need if you’re going to get a duck brand product for door/window drafts.
remember, i went late at night to Walmart to get something on the spot. they only carried/had those few duck brand quick-fix products. so it is all i can speak on.
your welcome! 😉😄 (for finding and surfing the corporate blog lol)
GUIDE TO CHOOSE THE RIGHT DUCK DOOR SEAL
The Big Rubber Ones—How to Install (1st on the list above)
The Cool Foam Ones—How to Install (2nd on the list above)
The Plastic Weird Ones—Discontinued (3rd on the list above)
Weatherization Products—Helping People DIY Their House Into Control
I’m glad i just stumbled onto the duck page. i had the self restraint from linking every single page i thought was cool 😂. i should have known though, of course they’re filled with helpful tips (using their products), DIY (using their products), Craft Ideas (using their products) and as i was poking around, i realized, wow i use and love a lot of these products! 😄
I HAD TO ADD THESE SUPER CUTE IDEAS I FOUND

Adorable Draft Guard!
This cute little plaid puppy will protect your windows and doors from letting in cold air!

Cute Fearsome Draft Guard Dog!
Let this adorable rottweiler puppy keep your home safe from the cold! Windows and Doors!
Starting Small. More to Come.
I know these are only three things on the list. These three things came from personal experience. I think it is a good starting point. The subject & goal (for this post and others to come) is
ways to fight the cold (or heat)
save money
save energy use
with a focus on DIY, Lost Cost, and Education/Home-Dweller Values
Fall/Winter Energy Saving Tips from Green Mountain Blog
Tips to Stay Warm & Save Energy and How the Govt Can Help
Green Mountain Energy Saving Center
Have you done any diy home weatherizing? do you have any tips? save us from the freezing cold & the sweltering heat!
COMMENT BELOW OR SHARE TIPS WITH EACHOTHER AT THE RURAL URBANITE FB GROUP!
(especially for those that live in cold climates! in the southeast usa, i have zero idea what that is like!)


